01. Singleton Bean에 Prototype Bean 주입하기
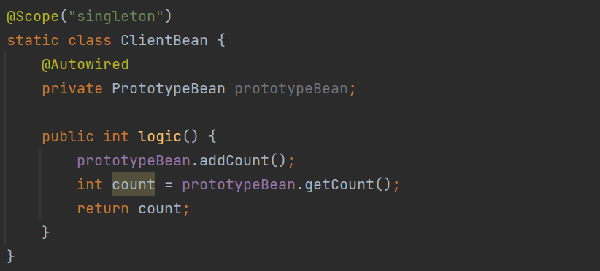
Singleton Bean에 @Autowired로 주입
Singleton Bean에 Prototype Bean을 주입 하면 해당 Prototype Bean은 Singleton Bean 생성 후 주입 받는 시점에 생성되서 주입 되고 끝나기 때문에 Prototype scope가 아닌 Singleton scope 로 작동이 된다.
👉 주입받은 Prototype Bean의 Instance는 계속 동일
👉 ProxyMode로 사용해보자
02. ProxyMode를 사용하여 Prototype Bean 생성하기
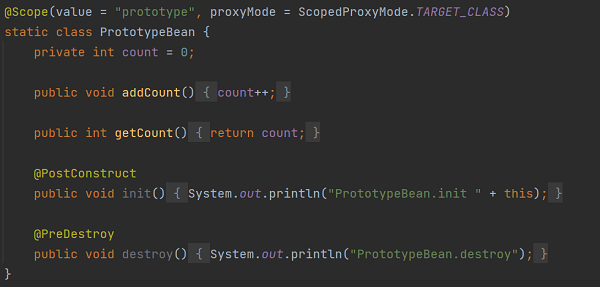
Prototype Bean에 proxyMode = ScopedProxyMode.TARGET_CLASS 옵션 추가
03. Singleton Bean의 logic() 처리

예상: count=1 ➡ 결과: count=0

addCount()와 getCount()를 호출 시 다른 인스턴스의 Bean이 생성되는 것을 확인
❓ 하나의 메서드(logic)에서 호출을 하는데 왜 다른 인스턴스가 생성이 될까?
ProxyMode를 사용할 경우 내부적으로 프록시 객체가 아닌 실제 객체를 BeanFactory로 부터 찾아서 명령을 수행하도록 구현되어 있다.
BeanFactory로 부터 찾는 과정에서 Prototype scope의 특성에 따라 매번 새로운 객체가 생성되어 반환된다.
👉 메서드 호출시마다 새로운 객체가 생성된다.
04. Provider를 사용
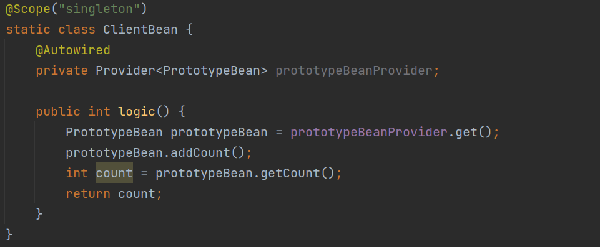
Provider를 사용하면 원하는 결과를 얻는것을 확인
@Scope에 proxyMode 제외!
05. 전체코드
package hello.core.scope;

import org.junit.jupiter.api.Test;
import org.springframework.beans.factory.annotation.Autowired;
import org.springframework.context.annotation.AnnotationConfigApplicationContext;
import org.springframework.context.annotation.Scope;

import javax.annotation.PostConstruct;
import javax.annotation.PreDestroy;
import javax.inject.Provider;

import static org.assertj.core.api.Assertions.assertThat;

public class SingletonWithPrototypeTest {

    @Test
    void singletonClientUsePrototype() {
        AnnotationConfigApplicationContext ac = new AnnotationConfigApplicationContext(ClientBean.class, PrototypeBean.class);
        ClientBean clientBean1 = ac.getBean(ClientBean.class);
        int count1 = clientBean1.logic();
        assertThat(count1).isEqualTo(1);

        ClientBean clientBean2 = ac.getBean(ClientBean.class, PrototypeBean.class);
        int count2 = clientBean2.logic();
        assertThat(count2).isEqualTo(1);
    }

    @Scope("singleton")
    static class ClientBean {
        @Autowired
        private Provider<PrototypeBean> prototypeBeanProvider;

        public int logic() {
            PrototypeBean prototypeBean = prototypeBeanProvider.get();
            prototypeBean.addCount();
            int count = prototypeBean.getCount();
            return count;
        }
    }

    @Scope("prototype")
    static class PrototypeBean {
        private int count = 0;

        public void addCount() {
            count++;
        }

        public int getCount() {
            return count;
        }

        @PostConstruct
        public void init() {
            System.out.println("PrototypeBean.init " + this);
        }

        @PreDestroy
        public void destroy() {
            System.out.println("PrototypeBean.destroy");
        }
    }
}
'Spring' 카테고리의 다른 글
| [Spring Security] 인증, 인가 실패에 대한 Exception 처리 (ExcpetionTranslationFilter, FilterSecurityInterceptor) (0) | 2023.03.07 |
|---|